🍚 Melissa’s Homemade Rice-A-Roni with Pork Chops

“Simple ingredients, slow moments, and the sound of a cast-iron sizzle — that’s what makes home feel like home.”

Some nights call for simple comfort — buttery rice, tender pork chops, and the warmth of real, homemade flavor. This recipe brings that perfect blend of cozy and hearty to your table, all in one skillet.

Ingredients:

1 cup rice Small handful of spaghetti, broken into small pieces 2 cups chicken broth (homemade or canned) 2 tbsp butter 1 tbsp oil 2–4 pork chops Seasonings: Salt & pepper Garlic powder Onion powder Paprika Garlic & herb blend

Instructions:

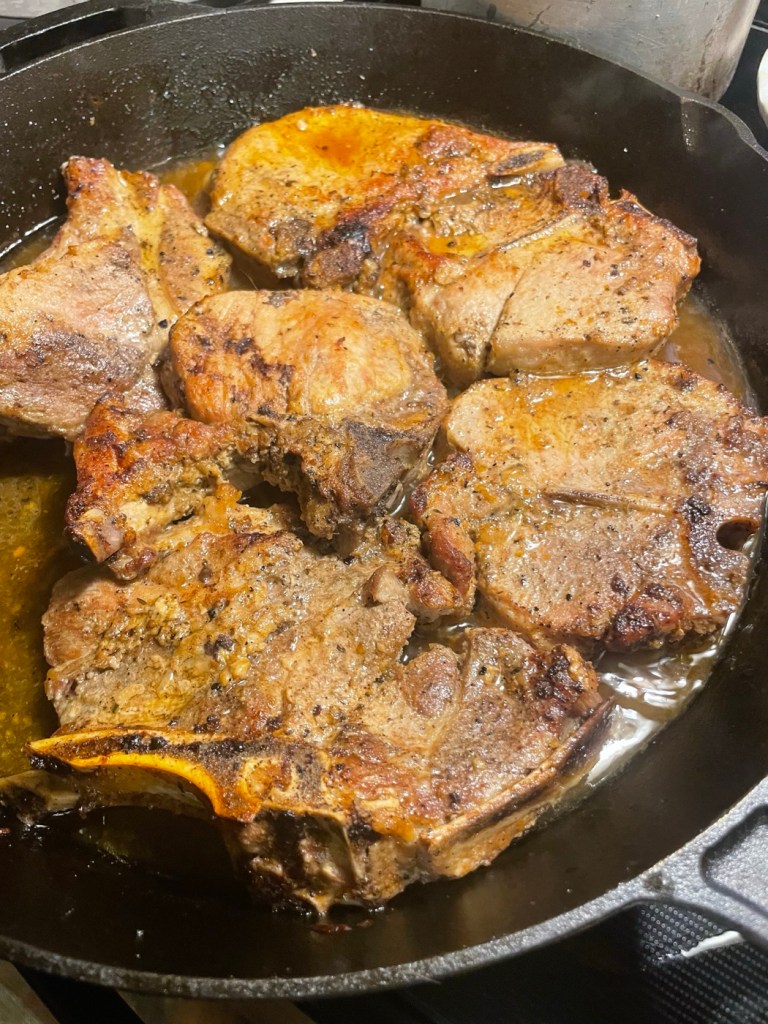
Start with the Pork Chops: In your cast iron skillet, heat butter and oil. Season pork chops with salt, pepper, garlic powder, onion powder, paprika, and garlic & herb blend. Pan-fry until golden on both sides, then remove from the pan and set aside. Toast the Rice & Spaghetti: In the same skillet (don’t clean it — those browned bits add flavor!), melt another bit of butter if needed. Add rice and broken spaghetti pieces. Stir often until lightly browned and fragrant. Add the Flavor: Sprinkle in your seasonings — a pinch of each — and stir to coat. Bring It Together: Pour in the chicken broth, scraping the bottom to lift up all the tasty bits from the pork chops. Bring to a gentle boil. Simmer & Soak: Lower the heat to a simmer. Nestle the pork chops back into the pan, cover, and cook for about 20 minutes, until the rice is tender and the pork chops are juicy. Serve Warm: Pair with your favorite veggie — we love green beans or roasted carrots — and enjoy a meal that feels like a hug.

✨ Homemade, hearty, and full of love — this one’s a SimplyUs classic.

✨Homemade Teriyaki

Some nights, I crave that perfect balance of sweet, salty, and savory—and nothing hits the spot quite like teriyaki. I love making my own sauce from scratch—it fills the kitchen with the most amazing aroma and tastes so much fresher than store-bought.

It starts with a simple base: soy sauce, brown sugar, garlic, ginger, and sesame seeds. If you’re out of brown sugar, don’t worry—mix white sugar with a bit of molasses and you’ve got the same cozy sweetness.

🍯 The Sauce

  1. Toast sesame seeds in a dry pan over medium heat until fragrant.
  2. Add 2 cups soy sauce, brown sugar mixture, minced garlic, grated ginger, a drizzle of sesame oil, and a pinch of onion powder.
  3. In a small bowl, mix cornstarch and water into a slurry. Stir it into your sauce to thicken, then reduce to low heat.

🍗 The Meat

You can use chicken, pork, or beef—each one soaks up the flavor beautifully.

  • For beef or pork, marinate first with a tiny bit of baking soda (½ tsp per pound) for tenderness.
  • Chicken doesn’t need the baking soda—just toss it in chunks straight into the pan with a little sesame oil.

Cook your meat in batches, adding a few spoonfuls of that glossy teriyaki sauce as it sizzles.

🌾 Serve With

We love ours over rice or yakisoba noodles, topped with veggies like bell peppers, broccoli, cauliflower, or peas and carrots.

It’s cozy, homemade comfort with a little touch of Japanese-inspired magic. 💛

Homemade Canned Mushroom Soup Base

“Simple, earthy, and perfect for creamy soups or cozy comfort meals.”

From my kitchen to yours — this recipe makes a rich, flavorful mushroom base that’s ready for anything: creamy soups, sauces, roasts, or casseroles. Once you have a few jars on your shelf, you’ll never go back to store-bought again!

Ingredients

  • 1 lb fresh mushrooms (sliced or chopped)
  • 5 cups water or beef broth (or try Lipton Beefy Onion soup mix for extra flavor)
  • Salt & pepper to taste

Directions

  1. Prepare the broth:
    In a large pot, combine the mushrooms and water (or broth). Simmer on low heat for about 30 minutes, letting the mushrooms release all their deep, earthy flavor.
  2. Get your canner ready:
    Fill your pressure canner with fresh water according to manufacturer directions. Warm your clean quart jars and lids.
  3. Fill your jars:
    Spoon mushrooms and broth evenly into 4 quart jars, leaving 1 inch of headspace at the top. Wipe rims clean, apply lids and rings finger-tight.
  4. Pressure can:
    Process in a pressure canner for 75 minutes at 10 pounds pressure, adjusting for your elevation.
    🕊️ (Always double-check your pressure and time with local altitude guidelines.)
  5. Cool and store:
    Let jars cool naturally before storing. You’ll hear that satisfying pop when they seal!

To Make Cream of Mushroom Soup

When you’re ready for a creamy version:

  1. Open one jar and pour into a saucepan.
  2. Mix ¼–½ cup milk with 1–2 tbsp cornstarch to create a slurry.
  3. Stir into the hot soup until thickened to your liking.

✨ Optional: add a pat of butter or a splash of cream for richness.

Serving Ideas

  • Stir into homemade spaghetti sauce 🍝
  • Pour over roast beef or pork 🥩
  • Use as a base for casseroles or gravies 🍲

Yield: 4 quart jars

Processing Time: 75 minutes at 10 lbs pressure (adjust as needed)

Shelf Life: Up to 1 year in a cool, dark pantry

🍗 Homemade Chicken Gravy — Simply Comfort in a Bowl

There’s something about a pot of chicken gravy simmering on the stove that feels like home. 🕊️

This one’s simple, hearty, and perfect for those cozy evenings when everyone’s gathered around the table.

You can pour it over mashed potatoes (our favorite!), spoon it over fluffy rice, or even drizzle it on noodles — but trust me, potatoes or rice are where it shines. 🤍

Here’s how I make it:

  1. Start with whatever cut of chicken you have — bone-in or boneless. I love bone-in because the broth turns out richer.
  2. Boil the chicken until tender. Once it’s done, remove the skin and bones (save them for homemade stock later!).
  3. Shred the chicken and keep that golden broth — that’s the heart of your gravy.
  4. Stir in a slurry of cornstarch and about ½ cup of milk to thicken and make it creamy.
  5. Season with salt, pepper, garlic powder, onion powder, and a dash of paprika.
  6. Let it simmer until it’s silky and smells amazing.

Serve it over mashed potatoes or rice, with a veggie on the side for the perfect cozy meal. 🥔🍚

✨ Simple. Homemade. Heart-warming.

🌮 Homemade Tamales: A Labor of Love

There’s just something special about tamales — especially when they’re made from scratch. I’ve always loved ordering them at a good Mexican restaurant (only if they’re made in-house, of course 😉). The dry ones just don’t compare! The real ones — the soft, flavorful, perfectly moist ones — that’s what I wanted to learn to make at home.

And let me tell you, once you try making them yourself… you’ll never go back.

🥩 The Filling

We love beef tamales in our home, but you can use chicken, pork, lamb, or even ground beef. I usually grab a good beef roast or steak — nothing fancy — and let the flavor build from there.

Here’s what I do:

Add your beef to the Instant Pot with a bit of water. Season it with cumin, salt, pepper, paprika, onion powder, and garlic powder. Roast garlic, chipotle pepper, bell pepper, and onion in the oven at 250°F for about 20 minutes until soft and fragrant. Add those roasted veggies into the Instant Pot with the meat. Pressure cook for 4 hours until the beef is tender enough to shred.

When it’s done, remove the veggies, shred the meat, and blend the veggies with the broth. Pour that blended sauce back in with the beef and cook another 20 minutes. It becomes this rich, flavorful filling that smells heavenly.

🌽 The Masa (Tamale Dough)

Now for the heart of it — the masa.

In a bowl, combine:

2 cups masa harina About ½ cup of the broth from your Instant Pot 5 tablespoons lard (for that authentic texture!) Mix until soft, smooth, and pliable — not sticky, just moist and tender.

🌿 Preparing the Corn Husks

Soak your corn husks in warm water for 10–15 minutes so they’re soft and easy to work with. Then spread a thin layer of masa (about ¼ inch) over each husk. Add a spoonful of your beef filling in the center.

Roll the tamales like a burrito — fold one side over the filling, then the other, and leave one end open.

🔥 Cooking

If you’re using an Instant Pot:

Add a small amount of water and your steamer insert. Arrange the tamales upright, open side up. Steam (pressure cook) for 1 hour.

If you’re using the stovetop:

Use a large pot with a steamer basket and some water on the bottom. Steam on low heat for about 1½ hours, checking occasionally to make sure there’s still water in the bottom.

You’ll know they’re done when they pull away from the husk easily and have that tender, cornbread-like texture.

🌶️ Serve & Savor

Serve your tamales with fresh lettuce, chopped tomatoes, cilantro, sour cream, and a drizzle of your favorite hot sauce.

They’re pure comfort — a homemade gift of flavor, patience, and love.

Because the best meals aren’t rushed.

They’re crafted — from the heart, for the ones you love. ❤️

Homemade Hummus

There’s something so special about making hummus from scratch — the smell of toasted sesame seeds, the creamy texture, and knowing exactly what goes into it.

It’s simple, nourishing, and made with love… just how we like it. 🌿

🌸 Ingredients

1 cup sesame seeds, toasted 2–4 tbsp olive oil (for the sesame sauce) 1 can garbanzo beans (chickpeas) — or 1½ cups cooked from dry ¼ cup lemon juice (fresh is best!) 2 tbsp olive oil 1 tbsp minced garlic 1–2 cloves fresh chopped garlic (optional, for extra flavor) ¼ cup sesame seed sauce (your homemade tahini mixture) Garbanzo bean liquid (saved from the can or cooking water) — add slowly Salt to taste

🌿 Instructions

Make your sesame sauce (tahini): Toast sesame seeds in a dry pan over medium heat until fragrant and lightly golden. Blend with 2–4 tablespoons olive oil until smooth and creamy. Set aside. Prepare the chickpeas: If using canned, drain and rinse — but save some of the liquid! If using dried, soak overnight and cook until soft before blending. Blend it all together: In a blender or food processor, combine: Chickpeas Lemon juice Olive oil Garlic Sesame sauce A little salt Slowly add in the chickpea liquid as you blend until it reaches your perfect creamy texture. Taste and adjust: Add a little more lemon, salt, or garlic if your heart says so. 💛 Serve and enjoy: Scoop into a bowl, drizzle with olive oil, sprinkle a little paprika if you’d like, and serve with veggies, pretzels, crackers, or pita chips.

🥣 Tip: Store in an airtight container in the fridge for up to a week — though in our house, it rarely lasts that long!

🍅 Homemade Roasted Tomato Soup

There’s something magical about turning garden goodness into a bowl of comfort. 🌿

When the tomatoes are ripe and the kitchen smells like home, this roasted tomato soup is my go-to — simple, wholesome, and full of flavor.

🌸 Ingredients

Fresh tomatoes (about 8–10 medium) 2–3 carrots, sliced (optional but adds sweetness) 1 onion, quartered 1 bell pepper (optional) 4–5 cloves garlic, peeled 1 tsp basil 1 tsp paprika 1 tsp garlic powder 1 tsp onion powder Salt & pepper to taste

🌿 Instructions

Roast the veggies: Place the tomatoes, carrots, onions, bell pepper (if using), and garlic on a baking sheet. Roast at 350°F for 20 minutes, until everything looks soft, golden, and fragrant. Simmer the goodness: Transfer the roasted vegetables to a large pot. Add your seasonings — basil, paprika, garlic powder, onion powder, salt, and pepper. Pour in a little water or broth if needed and let it simmer for 20 minutes, letting all that flavor mingle together. Blend it smooth: Use an immersion blender (my favorite!) or transfer to a blender to puree until creamy and smooth. Optional – Can it for later: Because there are no oils or thickeners, this soup cans beautifully! Use a pressure canner and process for 75 minutes to enjoy cozy bowls of homemade soup all winter long. Serve and enjoy: Ladle into bowls and serve with a warm, buttery grilled cheese. Trust me — it’s happiness in a bowl. 🥰

Melissa’s Cozy Swedish Meatballs

“This one’s a family favorite — rich, savory, and made with love in every bite.”

There’s something about a warm skillet and the smell of onions sizzling in butter that feels like home. This recipe brings together everything I love about comfort food — simple ingredients, deep flavor, and a touch of homemade magic.

Ingredients:

½ lb ground hamburger ½ lb Italian sausage 1 small onion, finely chopped 2 eggs ½ tsp nutmeg 1 tsp parsley ½ tsp garlic powder ½ tsp onion powder ½ tsp garlic & herb seasoning Salt and pepper to taste 1 packet beefy onion soup mix 2 cups water Optional: splash of milk for a creamier gravy Butter or oil for sautéing

Instructions:

Start with Flavor: Sauté chopped onions in a bit of butter until soft and golden. Make the Meatballs: In a large bowl, combine hamburger, Italian sausage, sautéed onions, eggs, and seasonings. Mix gently until combined, then form into meatballs. Cook to Perfection: In a skillet, brown the meatballs in batches over medium heat, covering with a lid to help them cook through. Create the Gravy: Remove the meatballs from the pan. Add one packet of beefy onion soup mix and 2 cups of water to the drippings. Stir until thickened. (Add a splash of milk if you like a creamier sauce.) Bring It All Together: Return the meatballs to the pan and simmer for a few minutes to soak up all that savory flavor. Serve & Savor: Spoon over rice or egg noodles, and enjoy every comforting bite.

✨ This is a meal that fills the house with love and the table with smiles.

🧀 Melissa’s Family-Favorite Macaroni & Cheese

“Boy, oh boy, does my son love to make this!”

Ingredients:

2 tbsp butter (or your favorite fat) 2 tbsp flour 2 cups milk 2–3 cups shredded cheese (we love Colby Jack, but cheddar, mozzarella, gouda, or parmesan all work!) ½ tsp garlic powder ½ tsp onion powder ¼ tsp paprika Salt and pepper to taste 1 lb pasta (elbow, shells, spirals, or even spaghetti) Optional: extra cheese or crushed crackers for topping

Instructions:

Make the Roux: In a saucepan over medium-low heat, melt butter and whisk in the flour. Stir for about 1 minute to remove the raw taste. Create the Sauce: Slowly whisk in the milk until smooth and slightly thickened. Add your cheese and stir until creamy. Season It Up: Stir in garlic powder, onion powder, paprika, salt, and pepper. Cook the Pasta: Boil noodles of your choice for about 8 minutes, then drain. Mix Together: Combine noodles and cheese sauce. You can serve it creamy right away… Or Bake It: Pour into a baking dish, top with a little extra cheese (and crackers if you like), and bake at 350°F for about 15 minutes until bubbly and golden.

Enjoy:

Creamy, cozy, and made with love — this is comfort food the SimplyUs way. 💛

Banana/Applesauce Bars

You know when you get a hair up your beehive? You should run with that idea, you never know what you will create.

I thought to myself that we should make cookies. I love to cook, my son loves to cook and so does my little girl. Then I thought I am not going to the store I am going to create something from the ingredients in my pantry. That is how these yummy bars became to life.

Ingrediants:

  1. 4 ripe bananas
  2. 2 Cups flour
  3. 1 teaspoon baking soda
  4. 1 teaspoon baking powder
  5. 1/2 cup applesauce ( I used my grandma’s homemade)
  6. 2 eggs
  7. splash of vanilla
  8. 1 cup brown sugar
  9. 1/2 oat meal

We combined all ingredients until mixed well. Spread in greased 8×11 pan and bake at 350 until fork pulls out clean about 15-20 min.